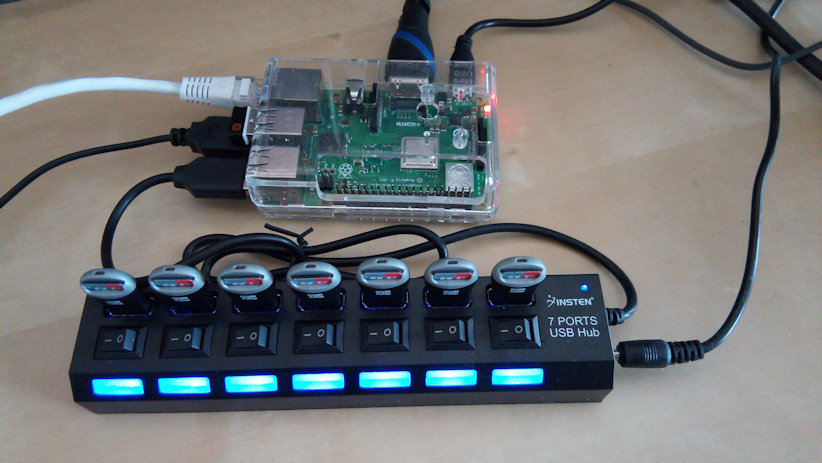
One of the most time consuming and costly aspects of distributing ConnectBoxes is the time and effort to duplicate all the microSD card. Normally, you would use something like Etcher to create them one by one. An alternative is to buy a 7:1 duplicator off of a place like Amazon but that isn’t cheap. Normally something like that goes for around $540 and gets more expensive the more ports you add. This project can reduce your costs and headache by showing you how to build your own duplicator for a little over $100. The time to create all the images simultaneously is under 4 minutes at a time

Stuff you need
- You will need a Raspberry Pi Kit. I recommend this one from Amazon which comes with the Pi 3, a case, the boot disk, power supply, and a HDMI cable. Amazon RPi Kit $69.99
- At least one powered USB 2.0 Hub. The model that I used is the Insten 7-Port model. Amazon Insten USB Hub $10.49 There are plenty of other powered USB hubs out there but I like that this one has the ability to turn on/off each hub separately. Just be sure to get a powered unit and don’t bother with getting a USB 3.0 hub. The USB ports on the back of the RPi are only 2.0 so you’ll waste the money on the upgrade. Although I only have one of these hubs, in theory, the RPi should be able to support writing up to ~24 microSD cards simultaneously. You could easily expand your writing ability out by just buying additional hubs and readers.
- microSD to USB card readers (7 – one for each port). I like the Sandisk model since it is not at all flimsy and I’ve never had issues with them. You can save a buck or two if you get a different model but I like that these are solid. [Amazon microSD Readers]https://www.amazon.com/gp/product/B001QLFNCC/ref=oh_aui_detailpage_o01_s00?ie=UTF8&psc=1 “Amazon”) $4.99
- A spare monitor, mouse and keyboard.
- A LAN cable or use the RPi’s built-in WiFi to be able to connected to the internet.
- microSD cards to write to that are obviously larger than the image that you plan on writing out to.
Building the Unit
Assuming that you got the above RPi kit, assemble the RPi by putting it into the case, connecting up the HDMI cable to your monitor, connecting up your mouse and keyboard to the USB ports, and inserting the microSD card that comes with the unit into the RPi. Now also would be a good time to hook up the USB Hub and insert all the readers with the microSD cards that you want to burn the image onto. Be sure to turn on each of the ports that you want to burn to. Plug in the unit which will start the boot up process.
Installer Script
Assuming that you are connected to the internet, you can use the installer script will take you through a brand new Raspian system through getting the OS completely prepared for running OSID.
On your RPi, open up a terminal window and type in the following:
wget https://raw.githubusercontent.com/GeoDirk/osid-python3/master/install_osid.sh
Once that file has downloaded successfully type in:
chmod 755 install_osid.sh
which will change the file permissions to executable. Follow that with:
sudo ./install_osid.sh
To start the process running. Once the script has completed, you’ll need to reboot your machine to finalize the settings. After reboot, there will be a new icon on your Desktop called “rPi SD Card Duplicator”. Double clicking this will launch the GUI.
Samba has been installed on your machine and has opened up a file share that you can see from your network. (Note: that you may have to fix the Workgroup setting in the file: /etc/samba/smb.conf). Either copy the image that you want to burn using the file share or copy it in locally by putting it in the directory /etc/osid/imageroot
As part of the installation, a new icon that will launch a File Manager with “root” privilges is available. You can download through the browswer your image files from here: https://github.com/ConnectBox/connectbox-pi/releases/ Once they are downloaded, use the new File Manager icon to navigate to your Downloads directory, cut and paste it in the the /etc/osid/imgroot folder. Once there, right click on the .xz file and select the “Xarchiver” option to open up the archive. This takes a REALLY unnecessarily long time but just wait it out. Once the archiver shows you the xxxx.img file, drag and drop it from the Xarchiver window into the /etc/osid/imgroot folder of your File Manager. Once it copies over, feel free to delete the .xz one as it no longer is needed.
